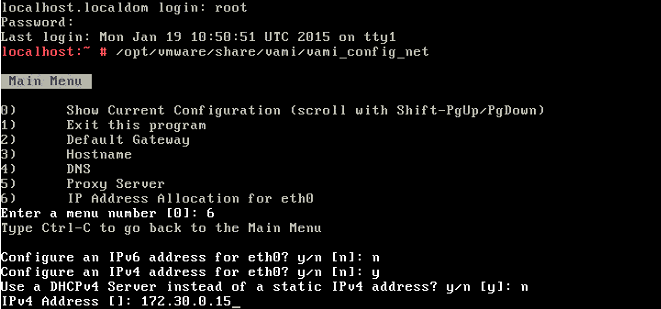
When deploying the VMware vCenter Server Appliance (VCSA) it will default look for a DHCP address. When there is no DHCP server available the following error is displayed:
NO NETWORKING DETECTED, PLEASE LOGIN AND RUN THE COMMAND /opt/vmware/share/vami/vami_config_net TO CONFIGURE THE NETWORK
Solution
1. Press F2 to login
2. Enter default username: root
3. Enter default password: vmware
4. Run command: /opt/vmware/share/vami/vami_config_net
5. Press 6 to setup eth0
6. After allocate a static IP Address to the VCSA the post configuration can be done by using the following URL:
https://static-ip-address:5480
Sander Daems is founder and author of this blog and working as a Lead (Sr.) Consultant by UNICA ICT Solutions. Sander has over 15 years experience in IT, primary focus: virtualization and modern worksplace.
More Posts - Website
Follow Me:


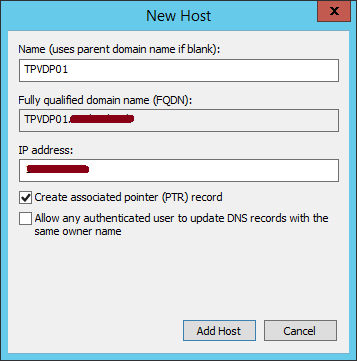
During the network configuration at the VMware Data Protection (VDP) appliance I received this warning message:
IP/DNS could not be resolved. Please check the hostname, domain, and DNS values for forward and reverse lookup validation
Troubleshoot:
VMware VDP whitepaper: Before you deploy vSphere Data Protection, an entry needs to be added to the DNS Server for the appliance IP address and FQDN. This DNS Server must support forward and reverse lookup. Failure to have DNS set up properly can cause many runtime or configuration issues.
As you can see, the nslookup failed:
Solution:
Add the domain and search domain in the /etc/resolv.conf file
And make sure you’ve created a correct PTR record at the DNS server for reverse DNS functionality, at the DNS server:
Select: Create associated pointer (PTR) record
More information: VMware
Sander Daems is founder and author of this blog and working as a Lead (Sr.) Consultant by UNICA ICT Solutions. Sander has over 15 years experience in IT, primary focus: virtualization and modern worksplace.
More Posts - Website
Follow Me:


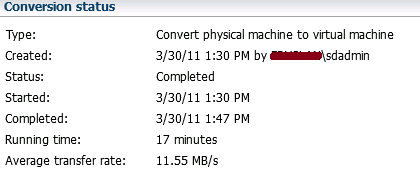
After migrating the last Linux Suse Enterprise 32-bit physical machine with VMware Converter Standalone 4.3 I received a error:
FAILED: Unable to obtain the IP address of the helper virtual machine

Solution:
The solution is simple, by converting the physical machine to a virtual machine the VM will start directly. By starting the VM the mounted Converter ISO will boot with a VM HelperNetwork. In case you’re VLAN doesn’t have DHCP functionality you need to configure a static IP for the VM HelperNetwork.
To assign a static IP address to the Helper virtual machine, select Use the following IP address: and specify the IP address, subnet mask, and default gateway. Be sure the IP address you specify for the Helper virtual machine is not already in use on the network.
(Optional) To configure the DNS server address manually, select Use the following DNS server address: and type the preferred DNS server address. Optionally, type and alternate DNS server address.
Select another option to set or click Next to view a summary of the conversion task. Converter Standalone uses the IP address and DNS server you specified to copy data from the source Linux machine to the destination virtual machine during conversion.

The VM will boot with the configured network settings:

P2V status:

Sander Daems is founder and author of this blog and working as a Lead (Sr.) Consultant by UNICA ICT Solutions. Sander has over 15 years experience in IT, primary focus: virtualization and modern worksplace.
More Posts - Website
Follow Me:


Recent Comments